Phase 2 - A DIY Solar-Powered Home LAN Audio Streamer that Can Record Samples at Solar Times
About this Tutorial
In this tutorial, I’ll walk you through the minimal steps to build a solar-powered home LAN streamer that can also automate recordings based on solar time. We’ll be using the code from our repository, but if you’d like to modify it for your own projects (and you’re absolutely encouraged to!), check out this more advanced tutorial for more details — including standalone solutions to some of the most annoying problems we ran into when deploying our streamers in the forest.
Shopping List
-
[ ] Raspberry Pi Zero 2W
-
[ ] Micro SD card (any size, we used 256GB but calculate storage needs based on recording time)
-
[ ] Stereo Audio Input Options we tested:
- [ ] 2 × MEMS microphones with breakout (no audio interface needed, extremely cheap but low quality)
OR - [ ] RØDE AI-Micro + 2 × Lavalier GO (most usb audio devices and lavalier mics will work)
- [ ] 2 × MEMS microphones with breakout (no audio interface needed, extremely cheap but low quality)
Solar Power Setup (optional)
- [ ] 1 × 120W solar panel
- [ ] Battery Charge Controller with 5V USB Output
- [ ] Any standard 12V car battery
Hardware setup
This part is mostly up to you! If you’re feeling adventurous and want to 3d-print the movable mic cases shown in the pictures, the RPi case, understanting the solar power requirements, or add a battery sensor, check out the more advanced tutorial.
Here, I’ll skip the solar power wiring details. If you use a solar panel from brands like EcoWorthy or similar, it usually comes with a controller. All you need to do is connect the 12V battery and the solar panel to the controller, then use the stepped-down 5V USB output to power the Raspberry Pi. Just keep in mind that solar panels should face south, and if you don’t need perfect optimization according to the season, an incline of about 45° or a little more should do the job.
Microphones
The USB audio devices are plug-and-play. Simply connect the micro-USB and run:
arecord -lIf you see something like USB Audio or the name of your device, you’re ready to move on to the software setup.
For the MEMS microphones, below a quick diagram illustrating the connections in a stereo configuration. (And yes… the wires aren’t exactly drowing contest material…)
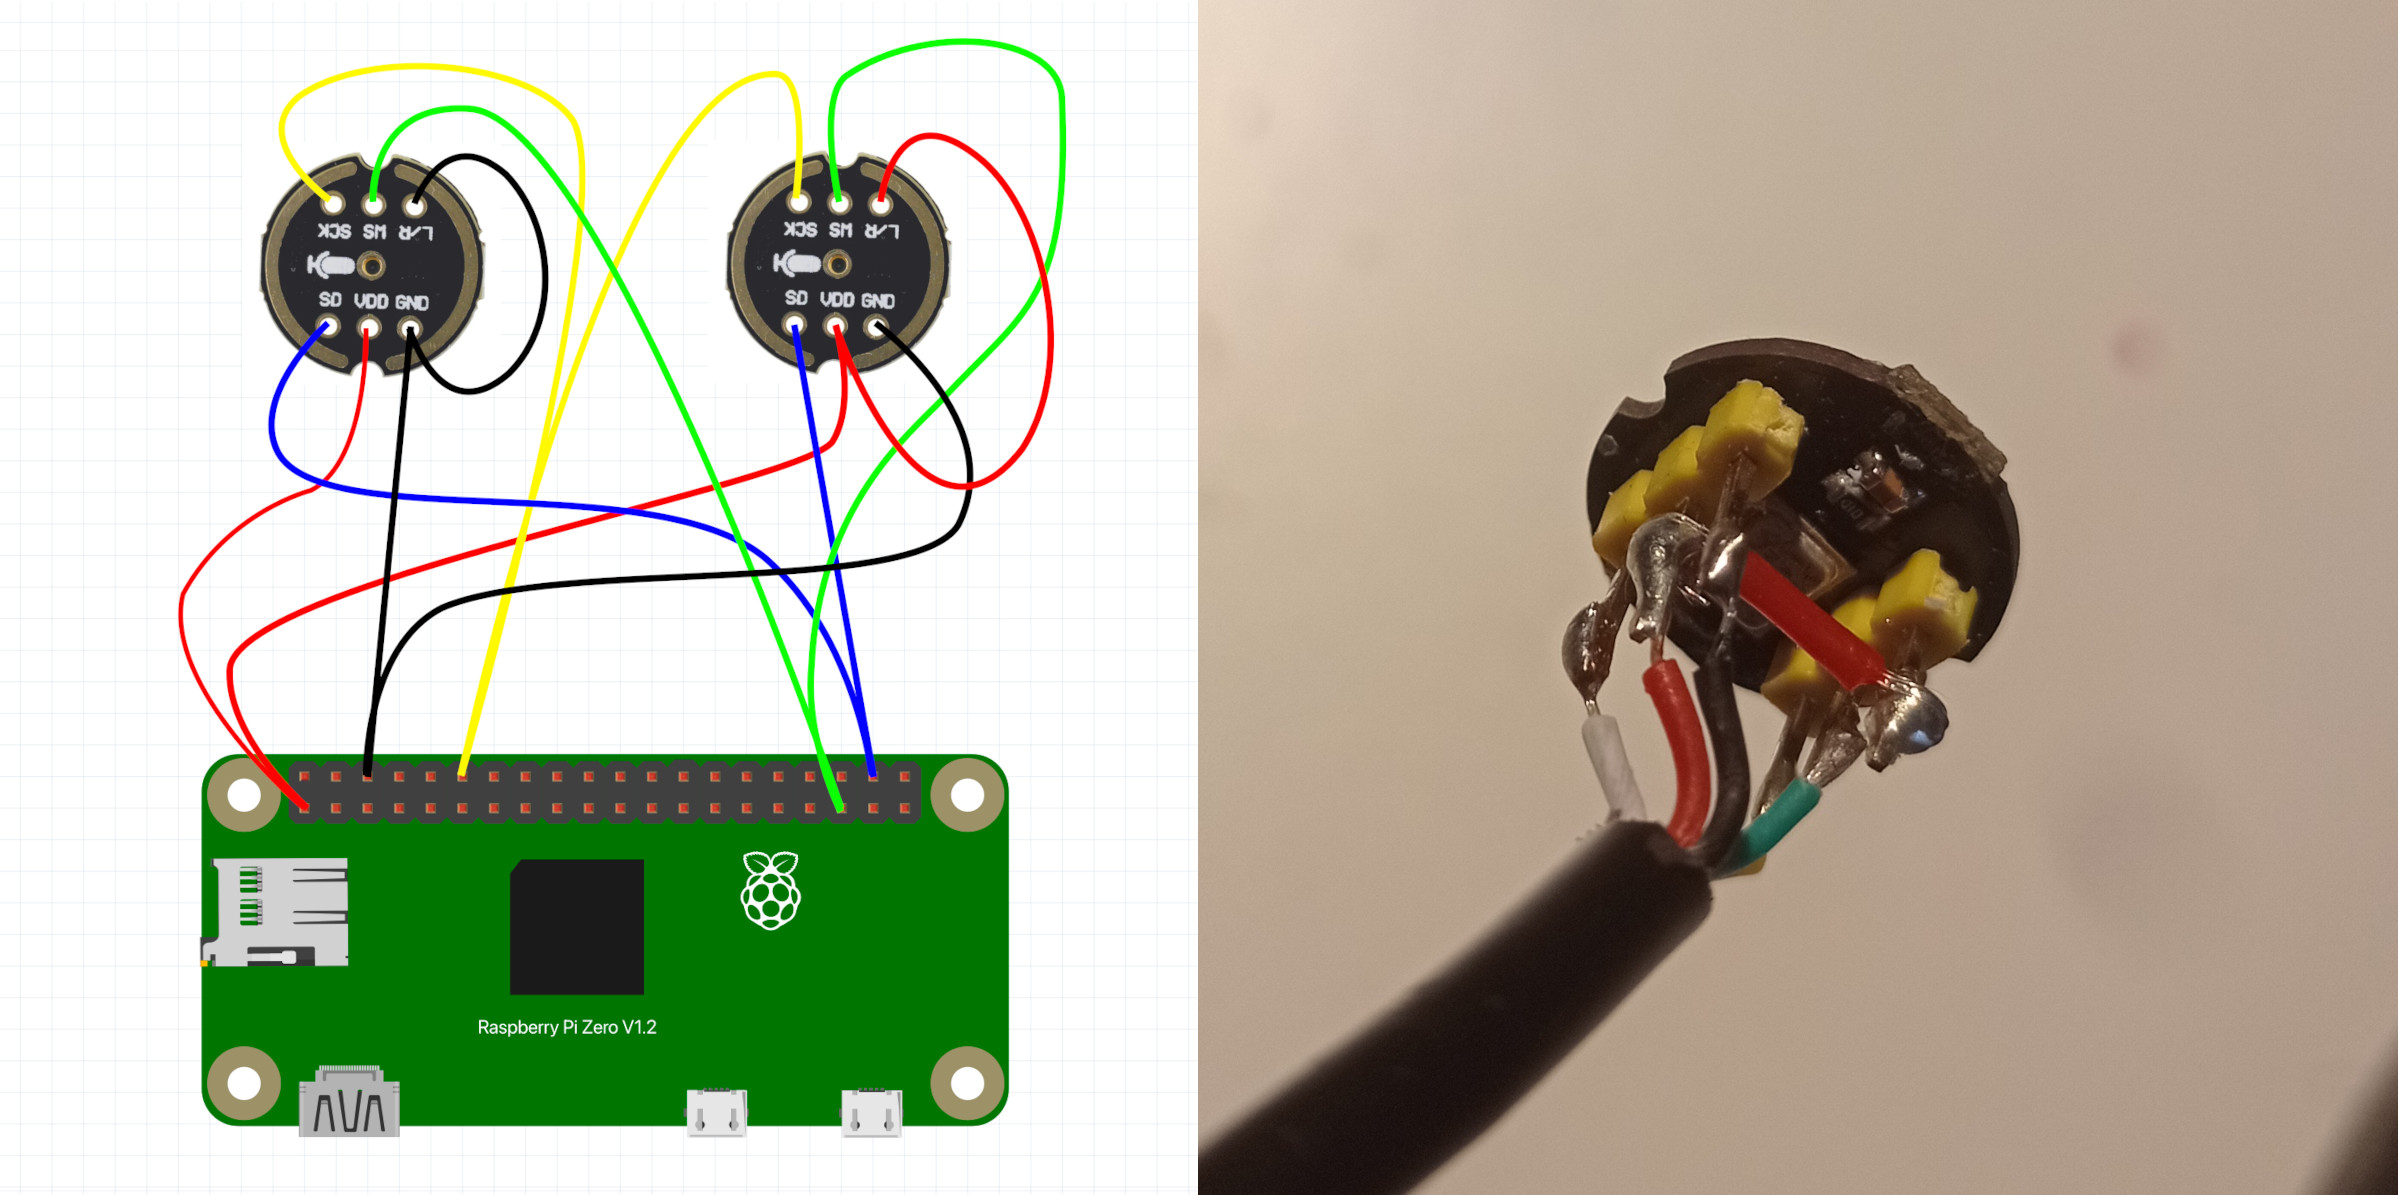
Connect the MEMS microphones and proceed with the software setup — they aren’t plug-and-play, so we’ll need the linux kernel headers and the drivers.
For a deeper explanation and tips on improving audio quality with the MEMS, or considerations about solar power requirements during winter refer again to the advanced tutorial. If your Raspberry Pi only powers itself and the two MEMS microphones, a single 120 W solar panel paired with a standard flooded lead-acid car battery should be sufficient even in winter. However, the seasonal difference is huge, and during months with limited sunlight (December and January), you may still experience periods offline.
Case
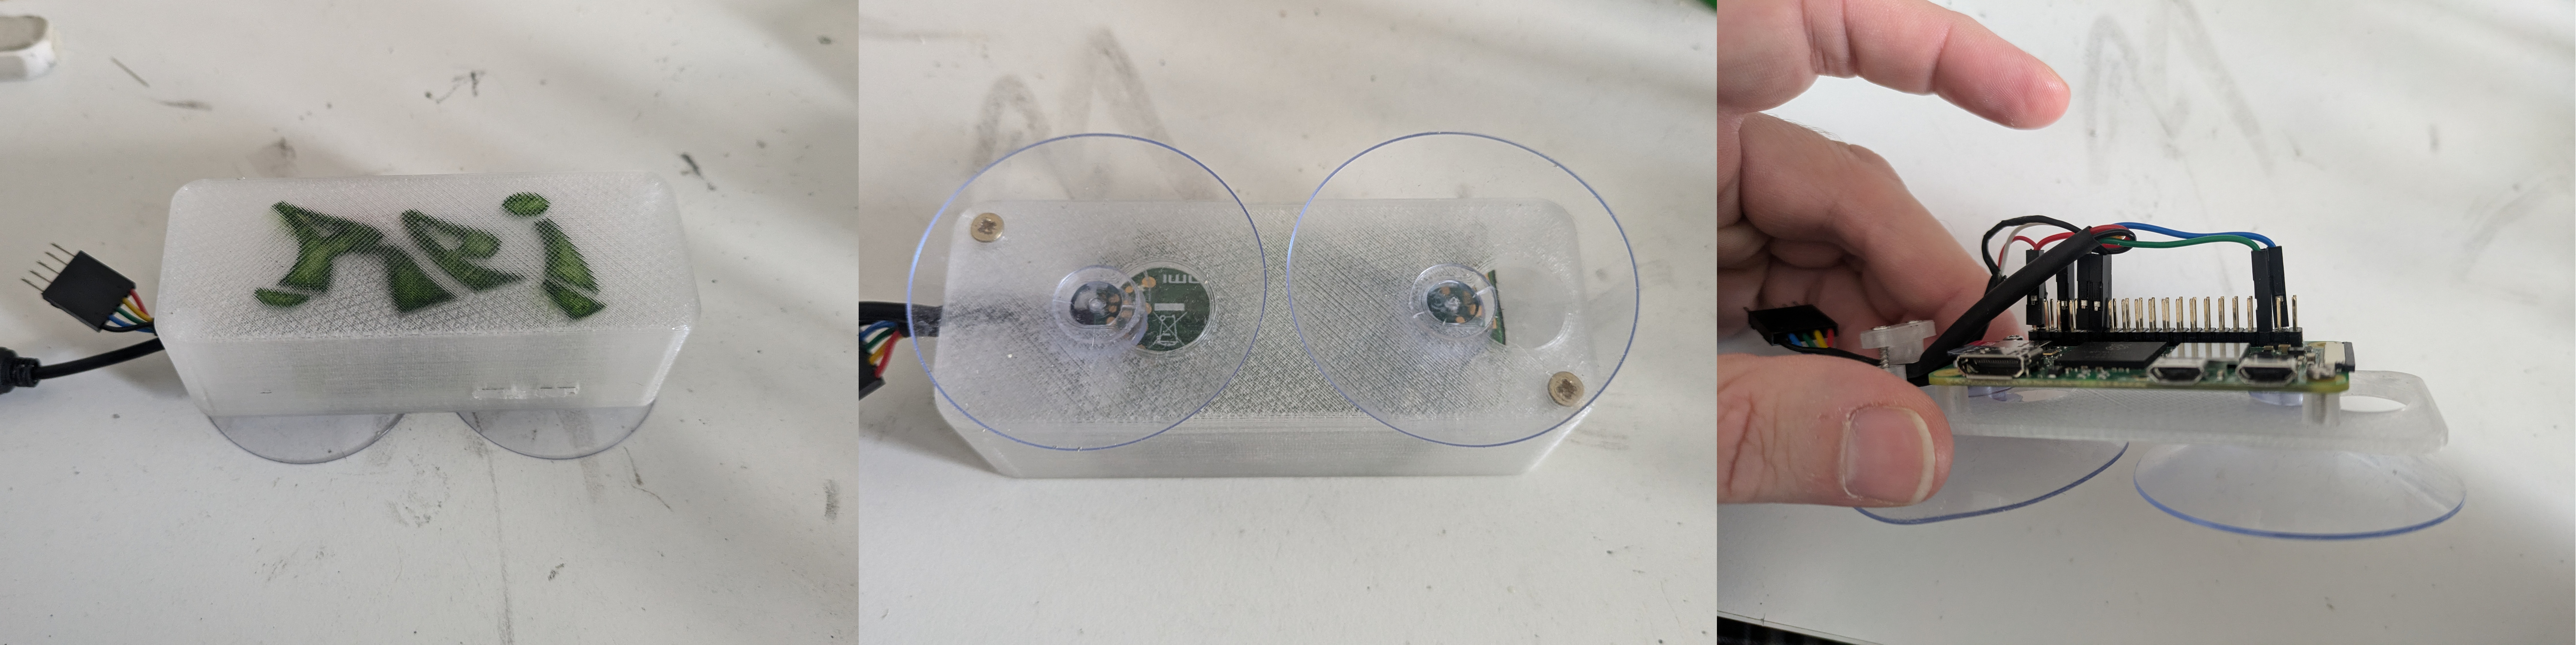
Below are models for two case designs with suction cups (about 5 cm in diameter) for window mounting.
Design Option 1
The first is ultra-compact and fits only the RPi Zero, with just enough room for the header connections.
Meshes
Design Option 2
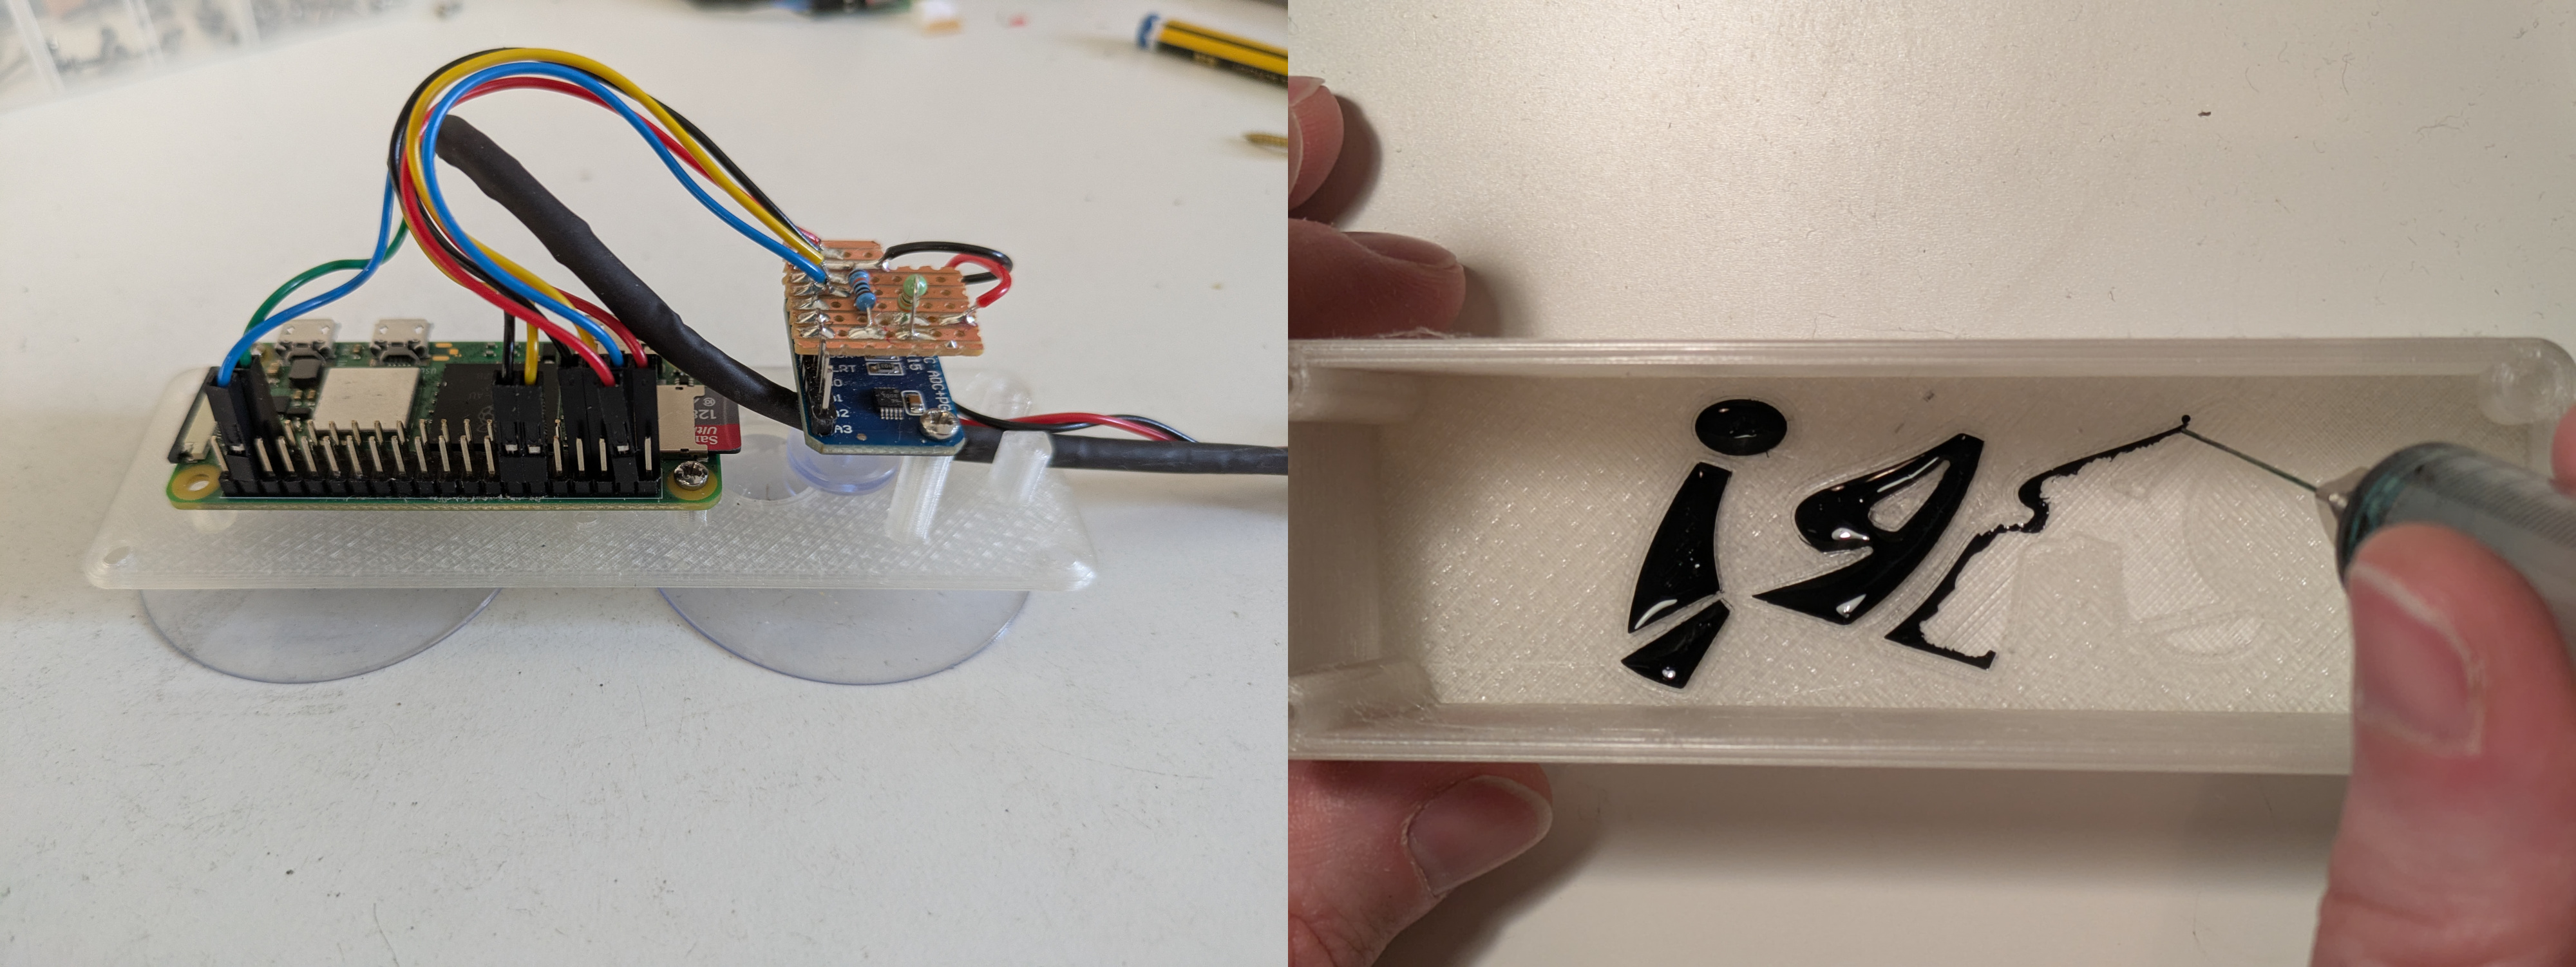
The second also includes space for an ADS1115 battery sensor — very handy when running on solar power!
And should you ask the following research question: “Why does it look like a throwback to 90s hip-hop???”
We can only hope that future research and the advancement of cutting-edge technologies, will one day shed light on this most essential inquiry.
Meshes
Software setup
Just a slightly more commented version of the steps described in our README.md file in the repo.
Prerequisites
If using MEMS microphones, enable I2S by editing the config file:
sudo nano /boot/firmware/config.txtAdd the following line at the end:
dtparam=i2s=onSetup
-
Download the project folder to your Raspberry Pi’s home directory. From the home folder:
sudo apt update
sudo apt install git
git clone https://github.com/sensingtheforest/audio-streamer.git -
Install all the necessary libraries.
- Grant execute permission to the scripts in the project folder:
cd audio-streamer
find . -type f \( -name "*.sh" -o -name "*.py" \) -exec chmod +x {} \;- Now run the install script:
./install.sh- When prompted, say yes to configure Icecast2. After that, you can just use the default settings. If you change the default passwords, make sure to remember them — you’ll need them later for the Icecast2 config file. When prompted to configure msmtp (email app), and asked that confusing question, just go with the default no.
- Say yes to reboot — this is the final step of the installer. If you changed the kernel headers setting in installer.sh, the installer will finish without rebooting.
- Note: The script should install all required packages from the repositories. All the packages are listed in the script. There are some parameters at the beginning of install.sh you can set to spare some time, otherwise it will do a full OS upgrade and compile the latest darkice version. This may take a while - get a cup of tea… or two…
-
For MEMS microphones, install drivers:
./mems-drivers.sh- Reboot when prompted (type
y). - Note: If not using MEMS microphones, skip to step 4.
- Reboot when prompted (type
-
Set up the microphone:
- Open the setup script:
sudo nano mic-setup___o.sh- Set DEVICE and FORMAT to match your microphone. You can find your device name running:
arecord -l- Save the file as mic-setup.sh (remove “___o”) and run it:
sudo mv mic-setup___o.sh mic-setup.sh
./mic-setup.sh- A 10-second recording test should start. You should see volume meters (or a vague memory of them) moving. Check for
mic-test.wavin the project folder. - You can adjust the microphone capture volume in alsamixer. Run:
alsamixerTo see the fader, click on
F6: Select your soundcard, and then show all volume controls withF5: All.If you want to repeat the test and observe the signal levels, run:
arecord -d 10 -D mic_out_shared -c 2 -r 44100 -f S16_LE -t wav -V stereo -v mic-test.wav -
Configure settings:
- Edit all remaining files ending in
"___o"with your settings. Settings are commented inside each file (msmtprc___o.txtis optional, see step 7). - Save them without
"___o"(e.g., editcommon___o.shand save ascommon.sh). - Note: You can keep the originals using
cpinstead of renaming them withmv, only those without"___o"will be used. I use mv to see right away which ones I’ve already edited.
- Edit all remaining files ending in
-
Test the stream:
./stream.sh- If everything is set up correctly, you should be able to access the stream through your Icecast2 server address, which typically looks something like
192.168.0.172:8000.
If you’re unsure about the address, check which IP has been assigned to your Raspberry Pi from your home modem’s admin page. - Note: This assumes that
darkice.cfghas been set up correctly, there are no errors in the terminal, and the last line ends withSCHED_FIFO.
- If everything is set up correctly, you should be able to access the stream through your Icecast2 server address, which typically looks something like
-
(optional) Enable email operations:
- Obtain an App Password from your email account (we used Gmail). Don’t use your Google account password! The app password is a special password created just for this purpose.
- Update the ‘from’, ‘user’, and ‘password’ fields with your own credentials.
- Save this file as a hidden configuration in your home folder and set the appropriate permissions.
sudo mv msmtprc___o.txt ~/.msmtprc
chmod 600 ~/.msmtprc- Enable IMAP on your email account to allow the Raspberry Pi to download attachments from your emails and receive remote updates.
-
(optional) Set up cronjobs for automatic problem solving and sending the logs:
- Open the crontab editor
crontab -e- Copy and paste this content in the crontab and save.
# The environment for cron jobs is more limited than your normal shell environment.
# Setting the PATH variable here ensures proper path resolution for all cron-executed commands and scripts.
export PATH=$PATH:/usr/local/sbin:/usr/local/bin:/usr/sbin:/usr/bin:/sbin:/bin

# By default, if a cron job generates output (stdout or stderr),
# it's emailed to the user who owns the crontab.
# Setting MAILTO to an empty string suppresses these emails.
MAILTO=""

# Health check every hour. Append states on uptime.log
30 * * * * $HOME/audio-streamer/monitor.sh

# At 3AM: check if darkice is streaming, if not reboot.
# Rebooting sends the log email so too often can be annoying...
0 3 * * * $HOME/audio-streamer/nuclear-option.sh

### (optional email operations, for this you need step 7)
# At 9PM: send the log file and limit the lines to the last 50000.
0 9 * * * $HOME/audio-streamer/rotate-log.sh; sleep 5; $HOME/audio-streamer/send-email.sh
# Every 4 hours: look for an email with a specific subject, copy its attachments to the main folder, then run blank.sh.
0 */4 * * * $HOME/audio-streamer/venv/bin/python $HOME/audio-streamer/update-code.py; sleep 10; $HOME/audio-streamer/blank.sh -
(optional) Create boot service to start the streamer when you turn it on. Don’t use the @reboot line in crontab! That is going to be trouble…
- Open
boot.service.txt
sudo nano boot.service.txt- Replace the placeholder values in the ‘ExecStart’, ‘User’, and ‘WorkingDirectory’ fields with your actual username. Save and exit the editor.
- Remove the extension and move the file to the correct systemd directory:
sudo mv boot.service.txt /etc/systemd/system/boot.service- Reload systemd, enable the service to run at boot, and reboot the system:
sudo systemctl daemon-reload
sudo systemctl enable boot.service
sudo reboot- After rebooting, you can check if the service is running properly with:
sudo systemctl status boot.service - Open
-
ENJOY!
Our code automatically records 5-minute samples at sunrise, solar noon, sunset, and once during the night (between sunset and sunrise). You’ll find the wav files inside audio-streamer/audio.
You can adjust the solar times in solar-crontab.py, and change the recording duration in common.sh, where you’ll also find several other system parameters. Using these parameters, you can deactivate the recording feature by changing RECORD=1 to RECORD=0 (you’ll need to reboot, or manually kill the active record screen session). For more details, refer again to the advanced tutorial.
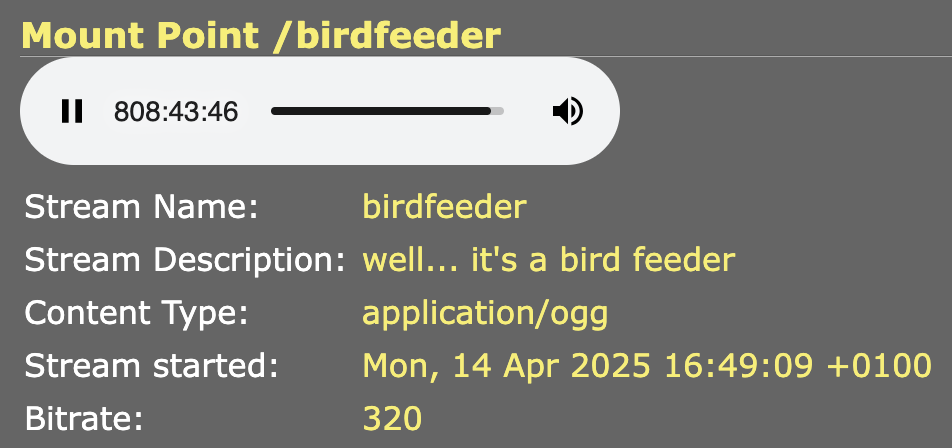
And yes, after more than 800 hours of uninterrupted, solar-powered streaming and recording, I’d say it’s safe to call it reliable 🎉